


In a galaxy far, far away, there are tales being told which will reshape the lives of millions. The Jedi battle the Sith, empires rise and fall, and small green blokes that live in swamps and mutter stuff about the Force. All of this is very important, sure, but none of it matters as much as the Galactic Racing League where real legends are made. Often by exploding into a ball of fire.
This guide is not intended to be an exhaustive piece on how to craft the perfect build, what every single one of the near 300 parts do or what mystery events may pop up early. It’s intended to prime you to understand the basic mechanics and concepts of the game, because there’s quite a lot going on.
Star Wars: Galactic Racer is a racing game built around runs called Tours, where you choose a route through events and improve your vehicle along the way. Winning races matters, but so does deciding how much risk to take. Do you pick a safer event with smaller rewards, bet against a faster rival for more credits, or buy a powerful Part with a fault you’ll have to deal with? Even the boost button asks how close to exploding you’re comfortable getting.
Those decisions shape each Tour. Some of your progress survives a failed attempt; some of it goes in the bin along with whatever’s left of your speeder. This guide covers the basics, from choosing events and keeping hold of your League Entry Tokens to understanding upgrades, vehicles and the different modes.
How do Tours work?
The campaign puts you in the helmet of Shade, a racer helping Galactic League owner Darius Pax deal with reigning champion Kestar Bool. Your progress takes you through Tours made up of events across several planets. Between races, you collect rewards and improve your vehicle, gradually assembling a build that can get you through the tougher events ahead.
The basic loop is straightforward: choose your vehicle and starting setup, pick an event on the route map, race, spend your rewards, then choose where to go next. Paddock visits give you a chance to talk to characters and sort out your machine before heading back out to race.

The campaign has three Acts. The planets come in a fixed order within each Act, but the event layout changes between runs. You’ll become familiar with the locations while facing different choices about how to move through them.
At the start of each Tour, you are granted a single League Entry Token. Lost it and the Tour is over
Your route matters because different events offer different rewards and risks. Here’s what the main early event types and encounters offer:
| Event | What you do |
|---|---|
| Race | A conventional race against a full field. Your finishing position affects your rewards. |
| Eliminator | Stay out of the elimination positions as the countdown runs. Reach the final three to avoid losing a token, then race for the best finish. |
| Field Test | Take a supplied vehicle through a timed challenge. Failing the target doesn’t cost a League Entry Token, making these one of the safer choices. Rewards are usually smaller than those from a regular race, though. |
| Mystery Encounter | The question-mark nodes. Meet characters who might offer a trade, a reward or a decision with consequences. Offers can help or hinder your run, so check what you’re agreeing to. |
| Scrap Dealer | Offers legendary Parts with faults attached. Repair opportunities can also become available here through unlocks. Read both the benefit and the fault before deciding whether a Part fits your build. |
What are League Entry Tokens, and how do you lose them?
League Entry Tokens keep your current Tour going. Lose them all and that Tour ends, sending you back to its beginning. That means rebuilding your vehicle for another attempt, although you keep several forms of permanent progress.
A normal Race costs a token if you crash too many times in the event. On Pilot, the recommended difficulty, the limit is three crashes per race. Crash for a 4th time, and your token is gone. Finishing down the field doesn’t cost you a token, although it affects your rewards.

In some events, losing the race also costs you a token. An Eliminator requires a top-three finish, while rival one-on-ones require a win. Later in the campaign, you’ll also face mandatory one-on-one events where losing costs a token, even if you don’t crash at all.
You can gain tokens during a Tour too. Mystery Encounters sometimes provide them, and certain Favors help with your token supply. There are many ways to get them, and having more than one will take some weight off your shoulders.
These examples aren’t an exhaustive list. Later Tours introduce more event types and encounters, so read the conditions before committing to an event, bet or deal. Check what you stand to gain and what you’re putting at risk, especially when a League Entry Token is involved.
How does difficulty affect crashes?
On Pilot, the recommended difficulty, you get three crashes per race, with your allowance refreshed between events. Favors can increase or decrease that allowance, so check the count shown in game if you’ve changed your starting setup.
There are four difficulty levels: Cadet, Pilot, Ace and Champion, from easiest to hardest. Your crash allowance decreases as you raise the difficulty, alongside the fact that opponent’s become faster and far more aggressive.
Champion also changes when crashes refresh. You don’t refresh all your crashes after each event. Instead, you only refresh three crashes at the start of each planet. With multiple events on each planet, crashes in an early race leave you with less room for mistakes later on. Favors and other effects can still modify your allowance, but you’ll need to make it last much longer.
How do side bets and rivalries work?
Before races, you can place a side bet that you’ll finish ahead of another racer. The higher that racer is predicted to finish, the more credits you can earn by beating them. You don’t have to win the whole race to win the bet, but picking a tougher opponent means taking a bigger risk.
Look for the League Token indicator beside certain racers in the betting list. Keep betting against them and finishing ahead of them, and you’ll trigger a short interaction. Continue beating them and the rivalry can lead to a one-on-one event.
These duels put a token on the line: lose the race and you lose a token. Finish first, though, and you snag an extra token. Beating a rival also unlocks their Favor for use in later runs, giving you a lasting reward for settling the argument at several hundred miles an hour.
How do Afterburner and Ramjet work?
Your speeder has two boost systems. Afterburner works much as you’d expect: use its charge for extra speed, wait for it to refill and use it again.
Ramjet gives you a much bigger boost, taking your speeder to its max. You prime it, then activate the boost. It’s useful for gaining ground or shunting opponents, but it builds heat while running. Once the indicator turns red, you’re redlining. Keep pushing it and you risk exploding, which tends to put a dent in your lap time.

Watch the heat indicator and get used to switching between the two boosts. Some builds benefit from redlining, but holding the Ramjet indefinitely is a gamble. Track conditions affect it too: water helps cool it, while Ando Prime’s freezing atmosphere lets you run it for longer. That cold can also interfere with your handling though, so there’s a trade-off to consider as you choose your line. Meanwhile, acid can corrode your vehicle and stop the Ramjet working temporarily. Pay attention, because many shortcuts involve dealing with planetary elements that will effect your race.
What’s different about the vehicles?
The three speeder classes handle differently, and each has its own cornering mechanic. Switching vehicles takes a little adjustment even on a track you already know.
- Landspeeders are sturdy and use Drift to get around corners. The drift feels heavy, so start it early and begin coming out of it early too. Waiting until you’re right on top of a bend makes it much harder to get the vehicle pointed where you want it.
- Speeder bikes turn sharply and accelerate quickly, but can’t take as much punishment as a landspeeder or skim speeder. Their special turning manoeuvre slows you down heavily but it also generates energy for a Kinetic Burst, giving you a boost as you accelerate out.
- Skim speeders reward smooth, arcing turns and gentler movements of the stick. You’ll keep more speed that way than by making aggressive corrections. Their Knife Edge manoeuvre rolls the vehicle onto its side to help negotiate tighter turns, and it can even help them fit through certain shortcuts.
Podracers appear later in the campaign and race separately from speeders. They’re much bigger and faster, so they have their own events and multiplayer races. They take an already fast game, and it turn it into a hell of a lot of screaming and controller-clutching.
What’s the difference between upgrades, Parts and Tuning Points?
This is the bit worth getting straight early, because several systems improve your vehicle in different ways.
Upgrade points improve your current build
Between events, you’ll normally choose one upgrade point from three randomised options. These upgrades improve base vehicle stats such as cornering, resilience, Afterburner and Ramjet performance, as well as your vehicle’s particular cornering mechanic.
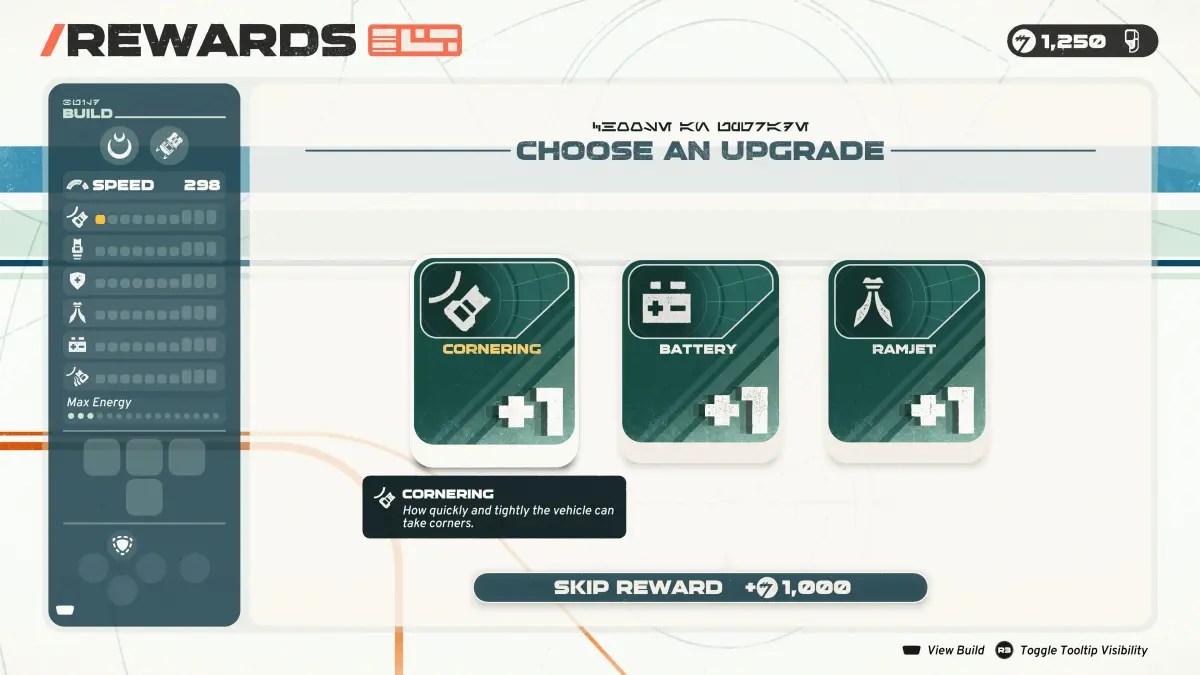
Eliminators offer two upgrade points, while other events, encounters and Favors can also provide upgrades. The options you’re offered help shape your build as the Tour progresses, so you won’t necessarily be improving the same stats every time.
These stat increases last for the current run. If you lose all your League Entry Tokens and have to start the Tour again, you’ll be building those upgrades back up.
Parts provide passive effects
Parts are equipment you fit to your vehicle. They provide passive effects which can activate under particular conditions, such as performing a driving action or reaching a certain vehicle state. Parts also come in different rarities, with higher rarities offering stronger effects, or can be upgraded to higher rarities. You can have up to four parts fitted at any given time, and they can be swapped out for a different one if you want to change your build, perhaps to better suit an upcoming planet.

You’ll get more out of Parts that work with the way you’re driving and the rest of your setup. A Part supporting Ramjet use, for example, is worth considering if that’s where you’ve been putting your upgrade points or if you have something else that improves Ramjet cooling. Other parts are more situational, but can still be very powerful when paired with the right build.
Faults and critical malfunctions
Taking damage, including hits from ion bolts or collisions, can put your vehicle into a malfunction. This leaves you vulnerable for a short time. Further damage during that window can destroy your vehicle or trigger a critical malfunction, which disables it while you complete a timed button-press minigame to get going again.
Critical malfunctions can also cause an equipped Part to develop a fault, adding a negative effect. However, hitting the small perfect recovery window in the minigame prevents a fault, so it’s worth trying to nail that timing.
Ordinary Parts don’t come with these drawbacks, but once a fault develops, you have to repair it. You can’t dodge the repair bill by simply swapping the faulty Part for a new one.

Most repairs happen at planetary stopovers, where the Scrap Dealer can fix faults for credits. As you unlock more options, repairs can also become available during a Tour through Scrap Dealer nodes, some Mystery Encounters or certain Favors. You won’t always have to wait until the next planet, but those opportunities depend on your unlocks, setup and route.
The Scrap Dealer also sells legendary Parts with faults already attached. Check the drawback before buying: you’re getting a powerful Part, but you’ll have to live with its fault until you can repair it. Sometimes you’ll be lucky, and the fault won’t affect how you drive too much, but sometimes you’ll get something that screws you over in multiple races until you can pay to get it fixed.
The Parts fitted during a Tour belong to your temporary build and are lost when that run ends.
Abilities are the things you activate
Abilities include shields and weapons, giving you something to use for protection or to interfere with other racers. Unlike a passive Part effect, you activate an ability yourself during the race. The abilities you have available are another part of the setup you develop as you progress through a Tour, and how often you can use them in an event depends on your Battery.
You’ll usually buy abilities from Hibi’s shop during planetary stops, although they can sometimes be given as event rewards. She also sells Parts and additional upgrade points for your vehicle, so it’s worth checking what’s available before heading back out. Your credits have several competing uses here, particularly if your current machine is being held together by optimism and an expensive repair bill.

There are nine abilities to look out for:
- Concussion Mine: Drops a proximity charge that applies Concussed and System Malfunction to nearby opponents when it explodes.
- Vent: Applies Cooled to your vehicle and reduces Ramjet heat.
- Shockwave: Blasts nearby opponents away and applies System Malfunction to those caught in it.
- Status Scrubber: Clears negative status effects. If it removes any, you also recover one energy.
- Ion Bolt: Locks onto the closest nearby opponent and applies Disrupted.
- Ion Blast: A crash ability that applies Disrupted to nearby opponents. When your vehicle resets, you get a substantial speed increase for each opponent affected.
- Shield: Applies Shielded for ten seconds.
- Autopilot: Flies your vehicle automatically for ten seconds, with reduced Ramjet heating while active.
- Surge: Applies Surging for ten seconds. Overtaking extends its duration, but an impact ends it.
Each ability has two or three upgrade paths you may encounter as you buy upgrades during a Tour. These can add effects or change how the ability works, such as freezing mines or multiple ion bolts. The list above covers their basic functions; check the upgrade descriptions to see what each version adds.
Tuning Points provide permanent progress
Tuning Points carry over between Tour attempts. You can spend them to unlock the three different vehicles classes, or permanently improve the base stats of vehicles you own. Those improvements give your next build a stronger starting point, up to a maximum level of 15. This means that while you can improve the base stats, you can’t simply keep failing Tours until your vehicle is super-mega-ultra powerful and unstoppable.
Kit Points carry over too. Kit Points are used for cosmetic customisation.
Your unlocked Racer Styles and Favors also remain available.
So a failed Tour doesn’t erase everything you’ve done. You lose the temporary upgrades and fitted Parts you assembled for that attempt, but keep the permanent progression that helps you prepare for the next one.
What are Racer Styles and Favors?
Before a Tour, you choose a Racer Style and up to three Favors. Your choices stay with you for that Tour run, so this is where you decide what sort of starting setup you want.
Racer Styles give you traits and abilities that influence how you race. Survivor starts you with a shield, for example, while Tenacious offers an autopilot ability. Completing a style’s unlock requirements during play makes it available for future attempts, and you can then upgrade each style by completing objectives, making it more useful for future runs.
Favors provide extra effects on and off the track. Some change your crash allowance or help with League Entry Tokens. You earn them through your dealings with other characters, such as beating a rival in a one-on-one or performing well for a Backer. Once unlocked, they become part of the selection you can choose from at the start of later Tours, and can also be upgraded over the course of the game. You can equip up to 3 Favors at any one time.
How do Backer contracts work?
At the start of each run, you pick a Backer who provides you with a League Entry Token.
On each new planet and at the start of the run, your Backer offers three randomised objectives and you choose one to work on across the planet’s races. These might ask you to spend a certain amount of time in first place, perform jumps or use your Afterburner for a set number of seconds.

Working on that objective earns credits after each event, but there’s also a broader evaluation of your performance on each planet. Your Backer rates both your finishing positions and how well you met the chosen objective, then awards bonus credits on top of the contract rewards you earned per event. You then choose a new objective from the three presented for the next planet.
As you would expect, try to pick an objective that meshes with how well you’ve been performing and your overall build.
How does multiplayer work?
Multiplayer offers Quick Races and Multiplayer Tours. Quick Race gets you straight into a race, while a Tour gives you a series of six events in which to develop your vehicle and then battle it out.
The first five events let you build up your vehicle for the final Championship race, and betting on your finishing position is a big part of that. Before each race, you choose a finishing bracket to aim for. The more ambitious your prediction, the better the bonus reward if you meet or beat it. Fall short and you still receive the regular event rewards, but miss out on the betting bonus.

That gives you a choice: back yourself for a top-three finish and chase the best rewards, or pick a more forgiving target and aim for a steady supply of useful Parts. Consistently winning smaller bets can help you build a strong vehicle for the finale, while repeatedly promising a podium and finishing somewhere near the car park won’t do your setup many favours.
The final race decides the winner, so the first five are your opportunity to put together the strongest build you can. A poor early finish still leaves you time to improve the vehicle before the Championship.
Speeder events support up to 12 racers, while separate podracing events support up to eight. Both vehicle categories have Quick Race and Tour options.
You’ll also earn XP as you play the multiplayer, which unlocks customisation options.
What are Arcade and Scenarios?
Arcade provides 50 curated events against the clock. Beat the target times to unlock more events, then work on improving your records. It also includes podracing challenges, alongside the speeder events and a few other twists on the standard formula.
Scenarios are longer challenges built around particular characters and their starting setups. Unlocking the corresponding Racer Style in the campaign unlocks its Scenario, so they give you another way to explore the styles you’ve discovered. These are 5 round mini-tours in essence, where you start with a specific vehicle, fitted parts and abilities, encouraging you to race in a certain way.

💸 Earn Instantly With This Task
No fees, no waiting — your earnings could be 1 click away.
Start Earning